1) 서버 설정을 위해 서버에 SVN 설치
다음의 URL에 접속하여 다운받는다.
http://subversion.tigris.org/servlets/ProjectDocumentList?folderID=91
그리고 설치한다.
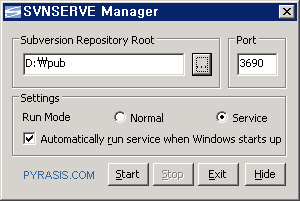
2) 서버 설정을 위해 서버에 SVNSERVE Manager 설치
다음의 URL에 접속하여 다운받는다.
http://www.pyrasis.com/blog/tag/SVNSERVE%20Manager
설치 후 저장소 디렉토리를 생성한 후 다음과 같이 설정한다.
이번 예제에서는 d:\pub를 repository로 지정하여 보았다.
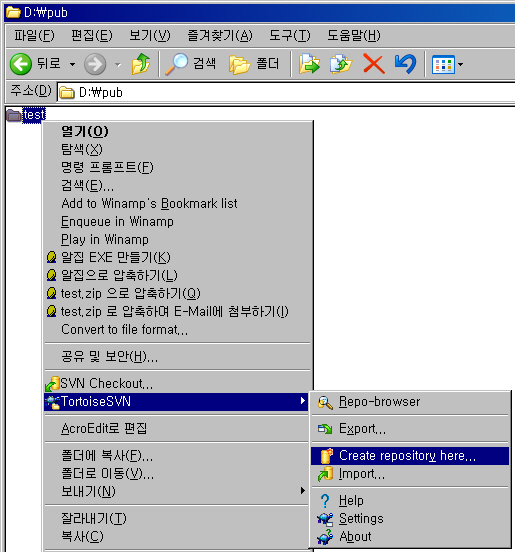
3) 서버 설정을 위해 서버에 TortoiseSVN 설치
다음의 URL에 접속하여 다운로드 한다.
http://tortoisesvn.net/downloads
설치 후 리부팅이 완료되면 프로젝트를 추가한다.
test라는 프로젝트를 추가하고자 할 경우,
우선 앞에서 설정한 Repository로 이동하여 test라는 폴더를 생성한다.
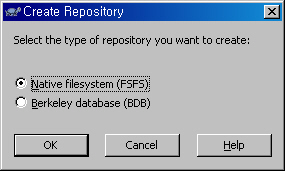
생성이 완료되면
conf/svnserve.conf 파일을 열어 하단의 붉은 부분처럼 수정한다.
이제 로그인을 할 수 있도록 계정을 설정해보자
conf/passwd 파일을 열어 [users] 밑에 사용자를 추가한다.
위의 예제에서는 demo라는 유저를 추가하고 비밀번호는 passwd라고 설정하였다.
이제 서버 설정은 끝났다.
필요한 사용자 계속 추가해서 협업을 하면 되겠다.
4) 클라이언트에서 사용시
3)과 마찬가지로 TortoiseSVN을 설치하고
원하는 위치에 폴더를 만든다. 그리고 오른쪽 버튼을 누르고 Check out을 누르면 된다.
주소 넣는 창에는 다음과 같은 형식으로 넣어주면 되겠다.
svn://address/project
다음의 URL에 접속하여 다운받는다.
http://subversion.tigris.org/servlets/ProjectDocumentList?folderID=91
그리고 설치한다.
2) 서버 설정을 위해 서버에 SVNSERVE Manager 설치
다음의 URL에 접속하여 다운받는다.
http://www.pyrasis.com/blog/tag/SVNSERVE%20Manager
설치 후 저장소 디렉토리를 생성한 후 다음과 같이 설정한다.
이번 예제에서는 d:\pub를 repository로 지정하여 보았다.
3) 서버 설정을 위해 서버에 TortoiseSVN 설치
다음의 URL에 접속하여 다운로드 한다.
http://tortoisesvn.net/downloads
설치 후 리부팅이 완료되면 프로젝트를 추가한다.
test라는 프로젝트를 추가하고자 할 경우,
우선 앞에서 설정한 Repository로 이동하여 test라는 폴더를 생성한다.
생성이 완료되면
conf/svnserve.conf 파일을 열어 하단의 붉은 부분처럼 수정한다.
### This file controls the configuration of the svnserve daemon, if you
### use it to allow access to this repository. (If you only allow
### access through http: and/or file: URLs, then this file is
### irrelevant.)
### Visit http://subversion.tigris.org/ for more information.
[general]
### These options control access to the repository for unauthenticated
### and authenticated users. Valid values are "write", "read",
### and "none". The sample settings below are the defaults.
anon-access = none
auth-access = write
### The password-db option controls the location of the password
### database file. Unless you specify a path starting with a /,
### the file's location is relative to the conf directory.
### Uncomment the line below to use the default password file.
password-db = passwd
### The authz-db option controls the location of the authorization
### rules for path-based access control. Unless you specify a path
### starting with a /, the file's location is relative to the conf
### directory. If you don't specify an authz-db, no path-based access
### control is done.
### Uncomment the line below to use the default authorization file.
# authz-db = authz
### This option specifies the authentication realm of the repository.
### If two repositories have the same authentication realm, they should
### have the same password database, and vice versa. The default realm
### is repository's uuid.
realm = 프로젝트 이름 또는 하고 싶은 말
이제 로그인을 할 수 있도록 계정을 설정해보자
conf/passwd 파일을 열어 [users] 밑에 사용자를 추가한다.
### This file is an example password file for svnserve.
### Its format is similar to that of svnserve.conf. As shown in the
### example below it contains one section labelled [users].
### The name and password for each user follow, one account per line.
[users]
# harry = harryssecret
# sally = sallyssecret
demo = passwd
### Its format is similar to that of svnserve.conf. As shown in the
### example below it contains one section labelled [users].
### The name and password for each user follow, one account per line.
[users]
# harry = harryssecret
# sally = sallyssecret
demo = passwd
위의 예제에서는 demo라는 유저를 추가하고 비밀번호는 passwd라고 설정하였다.
이제 서버 설정은 끝났다.
필요한 사용자 계속 추가해서 협업을 하면 되겠다.
4) 클라이언트에서 사용시
3)과 마찬가지로 TortoiseSVN을 설치하고
원하는 위치에 폴더를 만든다. 그리고 오른쪽 버튼을 누르고 Check out을 누르면 된다.
주소 넣는 창에는 다음과 같은 형식으로 넣어주면 되겠다.
svn://address/project
'소프트웨어 개발' 카테고리의 다른 글
| Windows PC에 네임서버 설치하기 (0) | 2008.04.08 |
|---|---|
| 스팟플렉스(Spotplex)는 MYSQL과 PHP로 개발되었다 (0) | 2008.04.01 |
| SVN 로그 분석 유틸리티 (0) | 2008.02.08 |
| SVN설치로 형상관리(버젼관리)를 쉽게 (0) | 2008.02.08 |
| CVS를 개선한 형상 관리 프로그램 SVN (0) | 2008.02.08 |